Guest Post by Richard Sheppard in Cloverdale, California
After searching many years for the perfect sketchbook, I finally gave up on the commercial brands and decided to make my own. For weeks I stayed up all night tearing paper, threading needles, poking holes in mat boards, and utilizing all kinds of gadgets, until finally I created the sketchbook I had been searching for. Here are the steps I used to make my favorite sketchbook.
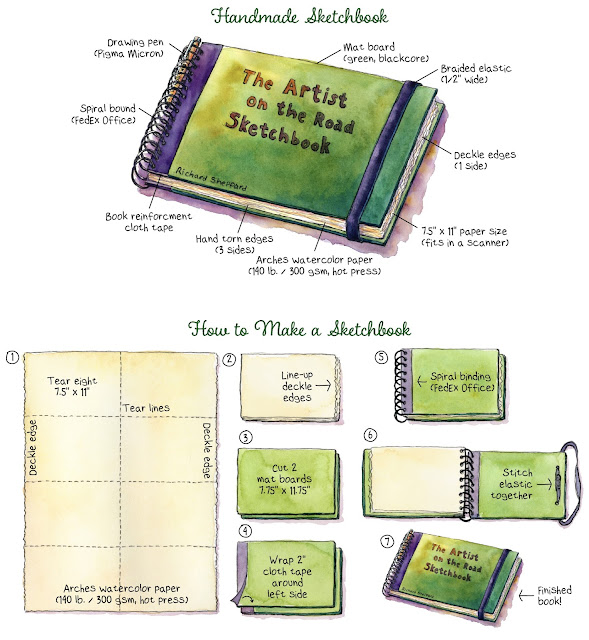
1) Measure out and tear (using the side of a ruler) a full sheet (22″ x 30″) of Arches watercolor paper into eight, 7.5″ x 11″ sheets (a full sheet is actually 22.5 inches wide so the individual pieces will be 11.25″ long including the deckle edge). Make sure the paper’s front side is up (watermark is readable on front side). Repeat until 4 full sheets have been torn into a total of 32, 7.5″ x 11″ sheets.
2) Organize torn sheets so all the deckled edges are together on the right side.
3) Cut two mat boards 7.75″ x 11.75″.
4) Wrap 2″ wide, book binding cloth tape lengthwise around the left side of each cut mat board, with approximately 1″ on top and 1″ on the bottom. This will give the binding more support.
5) Sandwich the stack of paper in between the two mat boards with the deckled edges facing away from the taped ends. Take the book to FedEx Office (or any other office supply store that has binding), and have it spiral bound along the taped side. I had FedEx Office spiral bind my sketchbooks, but it’s also possible to buy a spiral binding machine. Zutter’s Bind-It-all and We R Memory Keeper’s The Cinch*** are two products I’ve heard good things about, and both have YouTube video demonstrations.
6) Once your book is bound, use an awl to punch two holes into the back side of the mat board. (It’s a good idea to put a couple of layers of cardboard behind the mat before making the holes so as not to poke a hole through anything else.) Using approximately 21″ of elastic, push each end up through the holes, and pull tight until the elastic is snug around the sketchbook. Overlap the two elastic ends, and stitch them together with sturdy thread.
7) Finished!
Richard Sheppard, a member of Urban Sketchers Bay Area, is a freelance illustrator and fine artist based in Cloverdale, California. This process is an excerpt from his book, Impressions of Wine Country. You can see a lot more of his work here on his blog.